POSH KIDS- Easy 4th of July decorations

It summer and we know the kids want and need to do something. Why not make planning and getting ready for your family or neighborhood party a family affair?!

These simple red, white and blue paper chains are the perfect family craft project.

Here’s what you will need:


Kids craft scissors (for more fun the scalloped scissors or anyones with a decorative cut enhances the look)

Red construction or cardstock paper

Blue construction or cardstock paper

White construction or cardstock paper

Glue dots or photo mounting squares


Step 1: Go to your nearest craft store and/ or craft closet and find your cardstock. For the best deal purchase 12 x12 Hobby Lobby and Michales frequently put these papers on sale. So keep your eyes open for an even better deal!

Image

Step 2: Start to cut the strips at least an inch thick until you have the desired number of strips cut. This where the kids can start helping to cut, make sure you are guiding them in this process.

Step 3: Once all of your paper is cut assembly time begins

Step 4: Secure your first strip by connecting the ends by overlapping them with the glue dot. Repeat, repeat, repeat!

Image

Once you have made your chain your desired length it can be used as garland, a back drop, hung from the ceiling the possibilities are endless.

Hope you enjoyed this simple idea.

POSH recipes- Super Easy Mojitos!

If you can’t tell I am in really excited about the upcoming 4th of July holiday. So this week I decided to share yummy recipes for refreshing drinks.

We started with an easy punch and now on to one of my favs….Mojitos!

Image

Photo courtesy of The Real Housemoms

While surfing the web this little nugget popped out to us on The Real Housemoms blog. So this variation is a nice twist on a classic.

Before getting started make sure you have all the proper supplies. Don’t have a muddler use the end of a wooden spoon, but you can find a great muddler at your nearby Target, Walmart, Pottern Barn well you get the point.

Image

Moscato Strawberry and Lemon Mojitos are the most refreshing cocktails for summer, and they’ll please any crowd!
Author: Aubrey Cota
Recipe type: Cocktail
Serves: 2
Ingredients
3 large strawberries, chopped
juice of a lemon wedge
5 mint leaves
½ cup white rum
1 cup moscato wine
splash of lemon lime soda
strawberry and lemon slices for garnish
Instructions
in a large shaker
muddle the strawberries, mint leaves and lemon juice
pour in the rum and moscato
add ice, cover and shake
pour into two ice filled cups and
top with lemon lime soda
garnish with lemon and strawberry slices

Image

Photo courtesy of Nourished Kitchen

POSH Recipes- Summer Cocktail for the 4th of July!

Summer is officially here as we ALL know. With the 4th of July quickly approaching easy recipes for cocktails is a must. We saw this little nugget from Smirnoff and it’s exactly the right amount of refreshing and yummyness.

Before you start playing bartender make sure you have a great beverage dispenser. I suggest you invest in one with a built in stand, here’s a few of my favorites.


Target

Image

This honeycomb inspired design is a great all around great dispenser

Target

Image

This double dispenser is a great option for the host who loves to have options

Pottery Barn

Image

Okay you get the point a great dispenser is a way to elevate how your present your amazing drink concoction.

Go forth pour, sip and enjoy!

Image

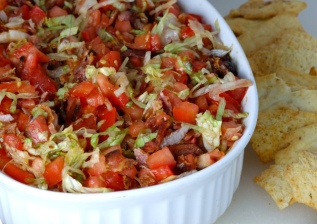
POSH Recipes- BLT Dip

So most of us love the summer time. Bright blue skies, cool breezes, golden tans and COOKOUTS! 

Are you tired of the typical sides french onion dip, pasta salad, deviled eggs, don’t get us wrong they are delicious but it’s time for a remix. 

With it being cookout season and football season quickly approaching, this recipe is a perfect addition to your next party. 

We saw this yummy recipe on Someone Left the Cake in the Rain and had to share with you guys. 

Image

This is a great recipe that can be made a day in advanced and then popped in the oven.

BLT Dip

Ingredients:

1 pound bacon, cooked, drained, crumbled, and divided

2 (8-ounce) packages cream cheese, softened

2 cups shredded mozzarella cheese

2 cups shredded Fontina cheese

1/2 cup sour cream

1/2 cup mayonnaise

1/2 teaspoon Italian seasoning

1 teaspoon garlic powder

2 tablespoons Dijon mustard

salt & pepper to taste

1 1/2 cups chopped seeded tomatoes

1 cup shredded Iceberg lettuce

Toasted bread rounds, crackers, or pita chips (I’m crazy about Stacy’s Pita Chips, Parmesan Garlic & Herb)

Image

Directions:

Preheat oven to 350˚. Spray a 11⁄2-quart baking dish with nonstick cooking spray.

Set aside 1⁄2 cup crumbled bacon.

In a large bowl, combine remaining bacon, cream cheese, shredded cheeses, sour cream, mayonnaise, Italian seasoning, garlic powder, salt, pepper, and Dijon mustard. Spoon mixture into prepared baking dish. Bake for 25 to 30 minutes or until hot and bubbly. Sprinkle chopped tomatoes, remaining 1⁄2 cup crumbled bacon, and Iceberg lettuce over hot dip. Serve immediately with toasted bread rounds, crackers, or pita chips.

Last minute graduation party centerpiece!!!!

Yes…..it’s definitely graduation time….you can STOP and BREATHE just for a second.

You’ve thought all about the food, cake, balloons but what about the centerpieces? Oh you haven’t thought about those at all. Well now you don’t have too.

This super cute idea is perfect for any graduation party, kindergarten to college. 

What you will need:

Photos 

Card stock

Paper cutter/ craft scissors

Photo mounting squares

Small vase

Color coordinating Ribbon

Candy of your choice (sixlets, jellybeans, etc) or even pebbles for the vase

10″ wooden dowels (in the wood craft aisle) or paper straws

Hot Glue Gun


Step 1) Find photos of the graduate. My suggestion would have photos from baby to present, the variety will make it more personal.

       Have siblings, family and friends assist you with this. Don’t have your photos printed send them to your local drugstore and they will have them printed in no time.

Image

Step 2) Go to your craft stash or your local craft store (Michaels, Hobby Lobby, etc) find card stock in your graduates school colors. If you school has more than one color definitely go with both for variety.

       You can average two (5×7) photos on each card stock sheet or three (4×6) 

       * Remember you want each photo to have a border from the card stock at least a 1/2 inch around

Image

Step 3) Either use a paper cutter, cricket or your favorite craft scissors

        You can be as creative as you want to be so you can go with a plain card stock and use a craft scissor with a design or you can go with a shimmer paper and cut straight edges.

       This is the beginning of your creative process, so let loose and start creating. Remember to leave at least an .5 inch for a border around the photo

      Image

Step 4) After cutting your card stock to the appropriate size it’s time to mount. Pull out those photo mounting squares.

         You will want to make sure the corners and sides of your photo are firmly adhered to the card stock party. Once making sure they are firmly attached it’s time for jazzing up the vase.

Step 5) Pull out those vases were about to elevate the look. Plug in the hot glue gun you will need it for this step.

         Take the ribbon you have and wrap it around the top or middle area of the vase. Make sure you only use hot glue, why you as well it will peel off later. 

         ** Simple tip burn the edges of your ribbon with a lighter so they won’t fray **

Step 6) Get your wooden dowel or your paper straws (I suggest paper straws automatically adds flair only if you are doing small favors)

         You will use the hot glue gun again. This time center the paper straw to the back of the card stock. You will want to make sure you leave at least 4.5 inches to have to go into the vase.

        Once your stick/ straw is secured time for the best part.

Step 7) Pour the candy of your choice into the vase

        Make sure your candy is color coordinated for the graduates colors. Also make sure the candy you get taste good, you never know who is taking a little taste.

Step 8) Finishing touches

       For a little added pop take some of your leftover ribbon and tie it into a cute bow at the base of the photo. 

       Take your stick and sit it in the candy and WALLA…you are all done!

Image

These centerpieces can be made totally in advance and just adding the the day before or day of. 

Be sure to share this with your crafty, or not so crafty friends and subscribe to our blog.

Until next time STAY POSH!


Easy tips to throw a great Graduation Party!

Of course everyone loves a party, but a party with a purpose is far more special. This time of year all across the country graduations are happening from Kindergarten to High School.

Most families want to throw a fun celebratory event, but don’t want it to look

a) cheap b) cheesy c) thrown together

So we a few helpful tips that can help you throw a beautiful and less stressful graduation party.

Tip #1 – Stop matching

What do we mean by this you say? Well we mean don’t buy the entire collection of the graduation section. You go into the store and you are looking to find all black and yellow graduation supplies, then everything looks exactly the same. STOP! You don’t have to purchase the entire set.

Be creative on how you decide to purchase because everything from the Banner to Napkins are in front of you doesn’t mean buy them.

Be smart, only purchase a couple of these pieces. No more than 2! Yes, no more than 2, why because it won’t be overwhelming and commercial looking. So you may want a graduation banner and napkins only, so don’t purchase the centerpiece (see tip #4), cups or plates.

Save some money by purchasing solid color cups and add a little flair with paper straws that coordinate. There are plenty of ways to save and still make your party look great.

Image

{images from sweetpaperies.wordpress.com}

Tip #2- Never do the baking

You think you will save money, but your time is precious around this time of year. A great way of having yummy sweat treats would be to either buy at your local grocery store (not always the best option) or find a local bakery get some amazingly delicious treats and customize them with custom created cupcake toppers.

Adding a touch of personalization will look like you have spent more money, but really you were able to keep some extra cash in your wallet.

This will add some flare and some simple creativeness quickly.

Image

Tip #3- Keep the food simple

Yes. We all love some delicious food but good can still be simple. Some easy ways to elevate your food is just simply the way display it.

For example don’t just place all the fruit you have on a platter, but simply place the fruit in mini plastic shot glasses or on a kabob elevates your table. Want to make your kabobs “POP” use a small cookie cutter to cut out various shapes, or better yet use number cutters for your graduates year.

Image     Image

{images courtesy of flickr & chew on that blog}

Tip #4 – Always create a custom centerpiece (it’s easier than you think)

Image

This Martha Stewart idea immediately looked like the perfect concept for a graduation party centerpiece! You could even recover the stacked books with cool, modern gift wrap in various prints & colors to coordinate with your party’s color scheme – and then decorate the sides with designs and the guest of honor’s name using rubber stamps like they’ve shown here. If you really want to get into the “school” theme – try recovering the books “high school style” with brown paper bags or kraft paper and ink-pen doodles (you know – the kind you used to draw when you were really supposed to be paying attention in class!).

For a thoughtful touch, designate one special keepsake book and ask party guests to sign messages to the graduate on it “yearbook-style” (on the outside and inside covers). If you use a photo album as the covered keepsake “book” – you can even fill the album at a later date with actual pictures from the party!

{image from marthastewart.com}

{shared from Hostess with the Mostess}

Image

If that book centerpiece doesn’t tickle your fancy or you’re just looking for more options go a very different direction. These edible graduation caps are not only cute but they are yummy. They can serve a dual purpose, favor and centerpiece.

These adorable graduation cap candy pops are the perfect idea. They look hard but are super easy to do. Our friends at have included all the instructions on how to make them in no time.

Our friends at Bakerella have given step by step instructions on how to create the yummy treats.

{image courtesy of Bakerella}

Tip #5- Don’t sweat the small stuff

It’s definitely easier said then done. Just remember the party you are throwing is in celebration so if little things. If things start to get chaotic, take a breath and rework things.

Everything will turn out fine. The graduate will still love the party custom cupcakes or not.

Breathe, Rest and Enjoy!